$1,140
111 Belle Street, Columbus, OH 43215(380) 333-9602Rent Savings
- 22 units available
- Studio • 1 bed • 2 bed
- Amenities
In unit laundry, Nest technology, Patio / balcony, Dishwasher, Pet friendly, New construction + more
Verified listing
Verified
To read a tape measure, start with the big, bold number, which marks the inches. Each inch is divided into smaller lines: the longest line is ½, the next is ¼, then ⅛, and the shortest lines are 1/16. Many tape measures also include metric units, usually beneath the inch marks, with large numbers for centimeters and smaller ticks for millimeters. Once you understand what those marks mean, you’ll be able to measure almost anything accurately.
If you’re planning to measure your apartment for new furniture, window treatments, rugs, or even the perfect nook for your pet, knowing how to read a tape measure is a must. It’s the tool that helps turn your vision board into reality—whether that’s fitting a sofa through the door or hanging shelves at the right height.
Before diving into how to read a tape measure, let’s get familiar with the main parts of this tool:
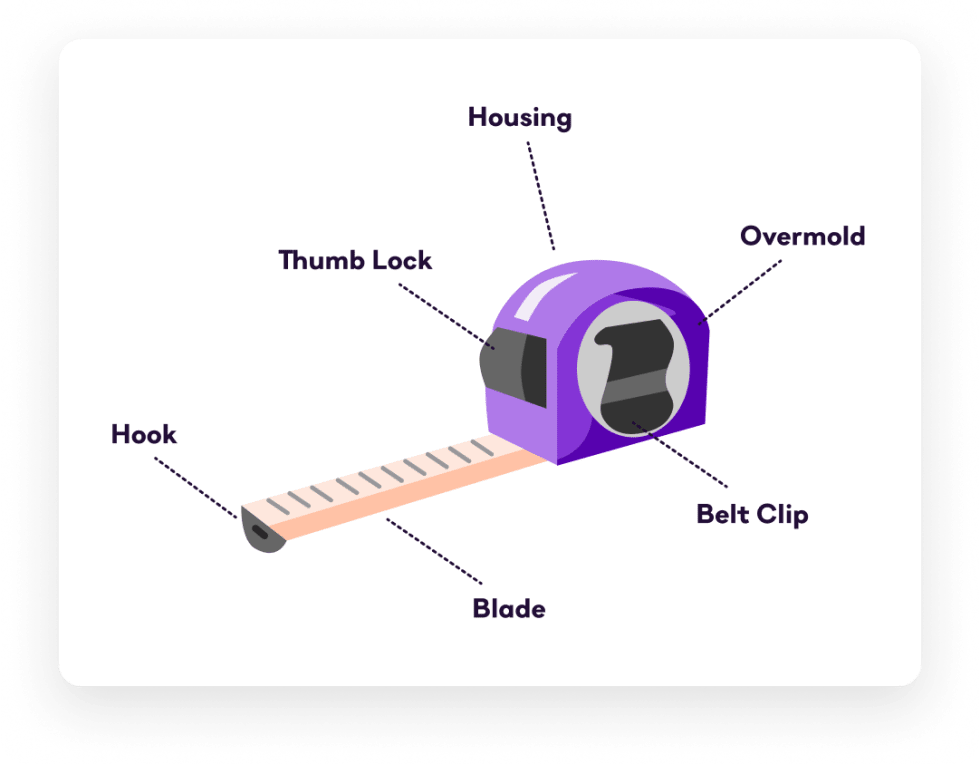
Once you’ve got the basics of a tape measure down, you’re ready to start measuring.
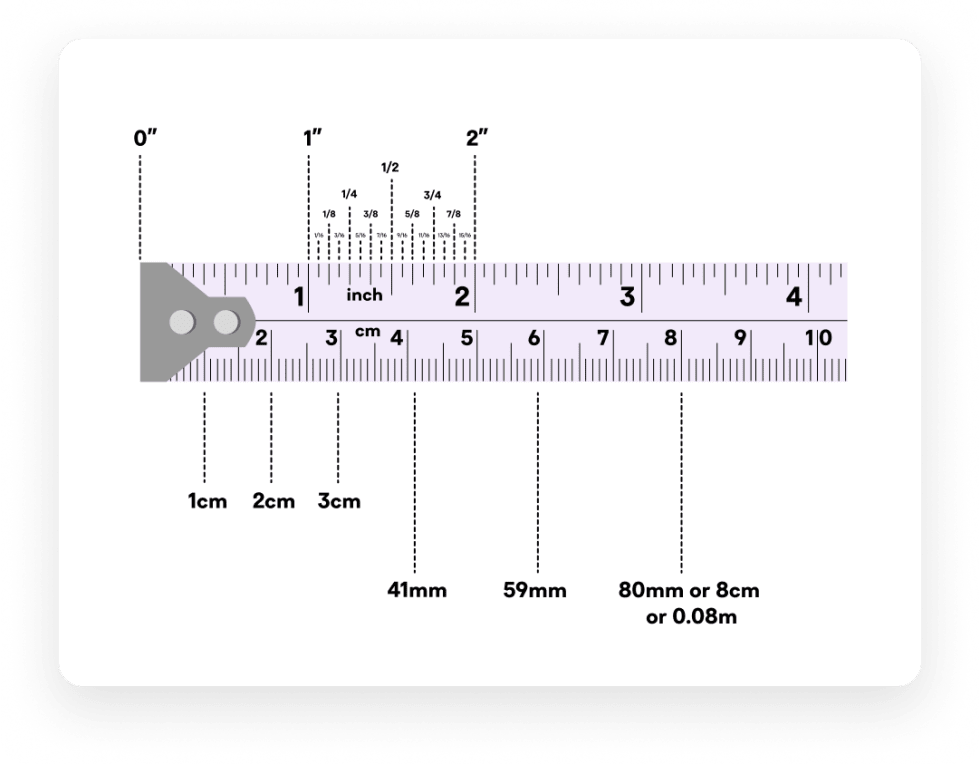
If you're in the US, it’s more than likely you’re using an imperial tape measure with inches on it. When looking at your tape measure, there are a number of markings on it for different sizes. The key to mastering a tape measure is taking the extra time to learn major measurement markings to use as a guide:
| Measurement Marking (Inches) | What it Means |
|---|---|
| 1″ (inch) | The largest measuring tape marks on the roll, found with a corresponding number, represent an inch. |
| 1/2″ (half-inch) | The next-largest tape measure lines are half-inch markings, with two found per each full-inch. |
| 1/4″ (quarter-inch) | Within each inch, you’ll find four lines smaller than the 1/2" markings, which signify one-quarter inch. |
| 1/8″ (eighth-inch) | Within each inch, you’ll find eight even lines smaller than the 1/4" markings, which signify each one-eighth of an inch. |
| 1/16″ (sixteenth-inch) | Within each inch, you’ll find sixteen of the smallest lines, even smaller than the 1/8" markings, which signify each one-sixteenth of an inch. |
| 12″ or 1 foot | Some rolls will have a black arrow in the foot increments on a tape measure. |
On the metric side (below the inch marks), you’ll see the measurement markings in centimeters:
| Measurement Marking (Centimeters) | What it Means |
|---|---|
| 1 cm (centimeter) | The large, numbered lines represent centimeters. |
| 5 mm (millimeter) | The half way point of each centimeter is designated with a longer line. |
| 1 mm (millimeter) | Smaller lines indicate the millimeter marks for each centimeter on the tape measure. |
| 1 m (meter) | Tape measures may designate a 1m mark with a darker line or arrow. |
Even if you mostly use inches, it’s helpful to know the centimeters, too, as furniture and decor often list metric dimensions.
There’s so much more than meets the eye when it comes to measuring tape, like these bonus features:
| Tape Measure Feature | What It Means |
|---|---|
| Black Diamonds | The black diamonds on measuring tapes are joist or stud markers. Joist marks are found at 19.2” intervals, and stud markets are at 16” intervals. |
| Length | The length of the measuring tape is printed on the case and the blade. It must be printed in each scale, whether it be imperial, metric, or both. |
| Roman Numerals | Measuring tapes have accuracy ratings labeled by Roman numerals. The most accurate level is Class 1, represented by the Roman number I. |
| Year of Manufacture | Some measuring tapes will have the year of manufacture printed on the blade. An M followed by a number is this date, so an M20 would mean it was manufactured in 2020. |
| CE Marks | A CE marking on your tape measure blade indicates that it conforms to all European Union regulations. |
| Testing Body | The testing body is the four-digit number responsible for issuing the certification. |
These extras won’t always come into play for everyday renters, but they can’t hurt to know.
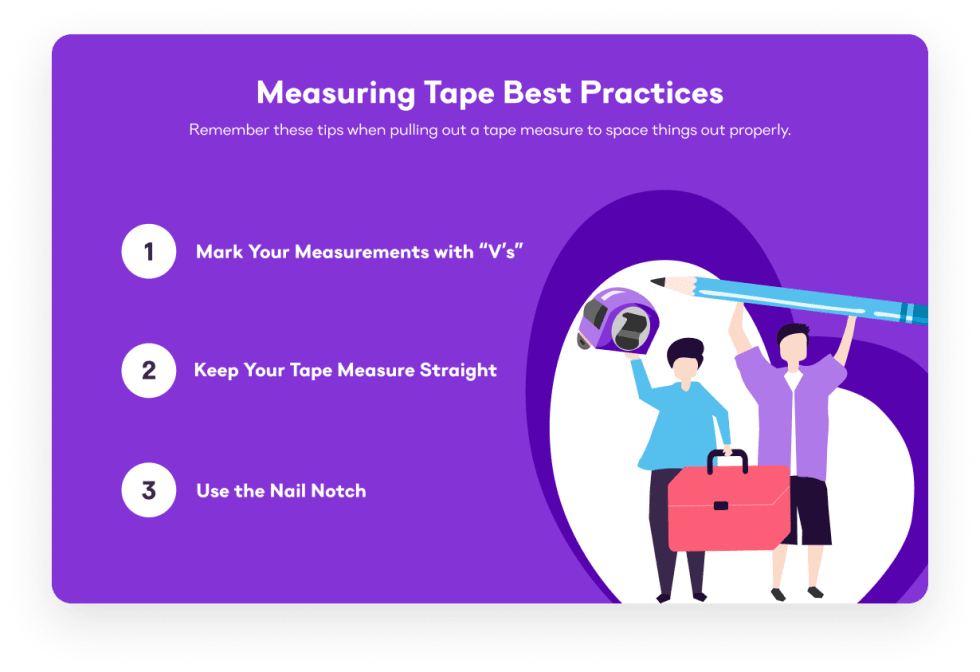
Accuracy is everything when it comes to fitting furniture or planning a room layout. Here are a few pro tips to keep in mind:
Keep the tape as straight as possible while you’re measuring. Your entire project can get thrown off, even if your tape measure is slightly crooked, resulting in a completely different measurement.
When measuring something, rather than a single line, mark your measurement with a V. It’ll be easier to find later.
The small slit in the metal tab of your tape measure is your nail notch. You can use it to get an accurate measurement from a point in the middle of the board by hooking it over the head of a nail or screw.
Keep a running list of your measurements either in your phone or a small notebook labeled by room (e.g., living room wall length, window widths, ceiling height). This way, you’ll always have your “home cheat sheet” handy when shopping for furniture, curtains, or rugs.
Some projects are easier with two people, like measuring a hallway or a big piece of furniture. But if you’re on your own, you can still get accurate results with a few tricks:
A tape measure is the gold standard, but digital tools can make life easier. Laser distance measurers and phone apps are great for quick room dimensions, especially if you’re working alone. That said, they’re not always as precise as a physical tape when it comes to tight spaces, doorways, or furniture.
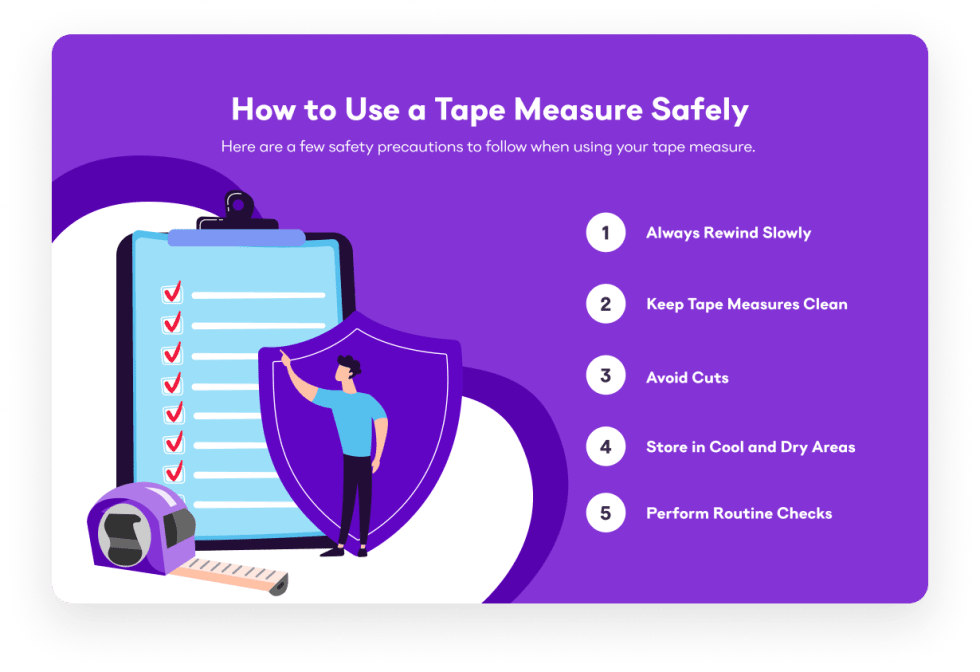
Yes, even something as simple as a tape measure comes with safety precautions. Here are some things to keep in mind:
Learning how to read a tape measure is one of those small skills that pays off in a big way. Once you’ve mastered it, you can measure with confidence and bring your DIY dreams to life.
Whether you’re ready to spice up your kitchen design, hang up that gallery wall, or make sure your couch can get through the door, you can do it like a total tape measure pro.
And if you’re ready to put those new skills to the test in a new apartment, we’ve got you covered. Take Apartment List’s personalized quiz to get matched with apartments that fit your space, your budget, and your style.
The big numbers on a tape measure mark inches, and every 12 inches equals one foot. Between the inch marks are smaller lines that show fractions of an inch: the longest is ½, then ¼, then ⅛, and the shortest are 1/16. On the metric side, the big numbers are centimeters, and the smallest ticks are millimeters.
Hook the metal tab on an edge or press it firmly against the surface. Keep the tape straight and flat, and read it at eye level. Write down the nearest inch plus the fraction.
One inch equals 2.54 centimeters. Multiply inches by 2.54 to convert, or divide centimeters by 2.54 to go the other way. Many tape measures show both, so you can just compare directly.
Read the nearest inch mark first, then count the fraction lines past it. For example, if it’s a little past 3 inches but before 3 ¼, you’re at 3 ⅛. The same approach works with centimeters and millimeters.
The metal hook on a tape measure shifts slightly to account for its own thickness. When hooked onto an edge, it slides out; when pressed against a surface, it slides in. That tiny movement keeps your measurements accurate.
A 25-foot tape measure is the most versatile—it’s long enough for rooms but compact enough for everyday projects.
Metal (rigid) tape measures are best for walls, furniture, and room layouts. Fabric tapes are more flexible and are better for curved surfaces, like measuring around a lamp base or cushion.
Most tape measures are designed with this in mind. On the back of the case, you’ll see a number showing the exact length of the tape measure’s housing. To measure inside corners, extend the tape until it touches one side, press the flat back of the case against the other side, and then add the housing length to the measurement on the tape. This way, you don’t have to bend or crease the tape.


In unit laundry, Nest technology, Patio / balcony, Dishwasher, Pet friendly, New construction + more
In unit laundry, Patio / balcony, Pet friendly, Stainless steel, Walk in closets, Gym + more